How to set up Palo Alto security profiles
Learning how to build and implement security profiles and policies can help novice admins make sure they use Palo Alto Networks firewalls effectively to protect their network.
Setting up and implementing a Palo Alto Networks firewall can be a daunting task for any security admin. After years of experience working at the company and seeing admins' pain points, Tom Piens, founder of PANgurus, wrote Mastering Palo Alto Networks to share his insights and help ease the process. In this in-depth tutorial, he offers advice to help novice and experienced admins alike get their firewall up and running, make the proper configurations and troubleshoot issues that may arise.
One major aspect of Palo Alto firewalls covered in Piens' book is building security policies and profiles. Once admins have set up a new Palo Alto device, the next step involves creating the security policies that best fit their organizations' needs. It's not a one-size-fits-all proposition -- not every company requires the same policies as another.
In this excerpt from Chapter 3, Piens breaks down three of the security profiles available from Palo Alto: the antivirus profile, anti-spyware profile and vulnerability protection profile. He discusses the licenses needed for each profile and the actions available in each, and he offers hints to help admins along the way.
 Click here to learn more
about Mastering Palo
Alto Networks by Tom
Piens.
More on Mastering Palo Alto Networks
Download a PDF of Chapter 3 for additional information on URL filtering, the Wildfire Analysis profile and more.
In this author interview, Piens discusses why he wrote the book, what licenses are needed to fully protect a network and what he would like to see from Palo Alto in the future to harden its firewall further.
Understanding and preparing security profiles
Before you can start building a solid security rule base, you need to create at least one set of security profiles to use in all of your security rules.
Important note
Security profiles are evaluated by the first security rule that a session is matched against. If a six-tuple is matched against a security rule with no or limited security profiles, no scanning can take place until there is an application shift and the security policy is re-evaluated. It is important for all security rules to have security profiles.
The Antivirus profile
The Antivirus profile has three sections that depend on different licenses and dynamic update settings. The actions under ACTION rely on the threat prevention license and antivirus updates, WILDFIRE ACTION relies on the WildFire license and the WildFire updates that are set to periodical updates (1 minute or longer intervals), and DYNAMIC CLASSIFICATION ACTION relies on WildFire set to real time. If any of these licenses are missing from your system, the actions listed in their columns will not be applied. Application Exception allows you to change the action associated with a decoder for individual applications as needed. The actions that can be set for both threat prevention and WildFire antivirus actions are as follows:
- allow: Allows matching signatures without logging
- drop: Drops matching signatures and writes an entry in the threat log
- alert: Allows matching signatures to pass but writes an entry in the threat log
- reset-client: Drops matching packets, sends a TCP RST to the client, and writes an entry in the threat log
- reset-server: Drops matching packets, sends a TCP RST to the server, and writes an entry in the threat log
- reset-both: Drops matching packets, sends a TCP RST to the client and server, and writes an entry in the threat log
Packet captures can be enabled for further analysis by the security team or as forensic evidence. They are attached to the threat log and are limited to packets containing matched signatures. Create a new Antivirus profile by going to Objects | Security Profiles | Antivirus.
As the following screenshot shows, we will use all the default settings:

We will now have a look at the Anti-Spyware profile.
The Anti-Spyware profile
The Anti-Spyware profile is extremely customizable and is built by a set of rules within the profile. These rules serve to change the default actions associated with each threat; so, if no rules are created at all, the profile will simply apply the default action for a specific signature when it is detected.
Anti-Spyware supports the same actions as Antivirus (allow, drop, alert, reset-client, reset-server, and reset-both), as well as block-ip:
- block-ip can track by source or source-destination pair and will block the offending IP for a duration of 1-3600 seconds. Tracking by source will block all connections from the client for the duration of the block, while tracking by source-destination will only block connections from the client to the target destination and will not block the same client from connecting to other destinations.
The Packet capture options include none, single-packet, and extended-capture. While single-packet only captures the packet containing the payload matching a signature, extended-capture enables the capture of multiple packets to help analyze a threat. The number of packets captured by extended-capture can be configured via Device | Setup | Content-ID. The default is 5.
Important note
Enabling packet capture on all threats does require some CPU cycles. The impact will not be very large, but if the system is already very taxed, some caution is advised.
Severity indicates the severity level of the threat that applies to this rule.
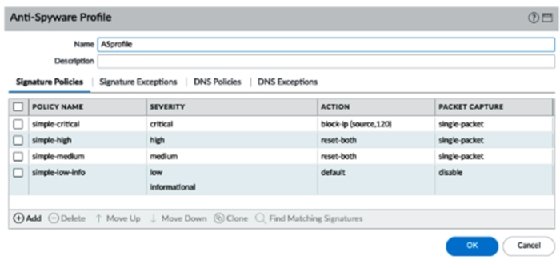
Create a new Anti-Spyware profile, as in the following screenshot, and add the following rules:
- POLICY NAME: simple-critical
- SEVERITY: critical
- ACTION: block-ip (source, 120)
- PACKET CAPTURE: single-packet
- POLICY NAME: simple-high
- SEVERITY: high
- ACTION: reset-both
- PACKET CAPTURE: single-packet
- POLICY NAME: simple-medium
- SEVERITY: medium
- ACTION: reset-both
- PACKET CAPTURE: single-packet
- POLICY NAME: simple-low-info
- SEVERITY: low, informational
- ACTION: default
- PACKET CAPTURE: disable
Your profile will now look like this:
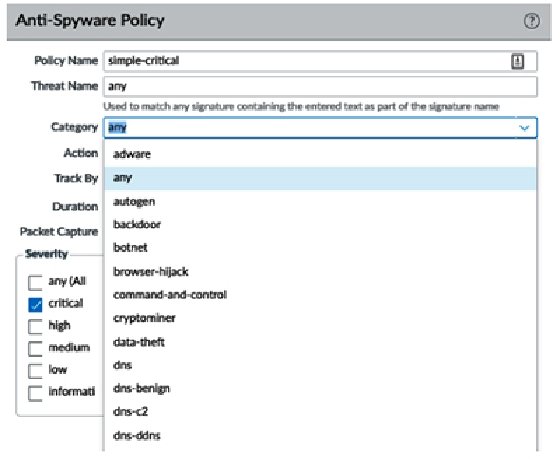
As you can see in the following screenshot, we need to make sure we review Category as this allows a fine-grained approach to each specific type of threat if granularity and individualized actions are needed at a later stage:
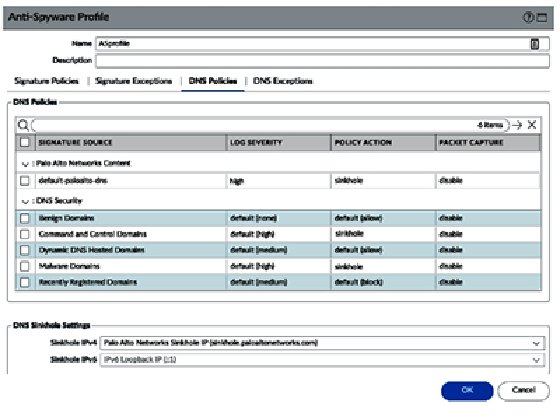
The Anti-Spyware profile also contains DNS signatures, which are split into two databases for the subscription services.
The content DNS signatures are downloaded with the threat prevention dynamic updates. The DNS Security database uses dynamic cloud lookups.
The elements in each database can be set to Alert, Allow, Block, or Sinkhole. Sinkhole uses a DNS poisoning technique that replaces the IP in the DNS reply packet, so the client does get a valid DNS reply, but with an altered destination IP. This ensures that infected endpoints can easily be found by filtering traffic logs for sessions going to the sinkhole IP. You can keep using the Palo Alto Networks default sinkhole, sinkhole.paloaltonetworks.com, or use your preferred IP.
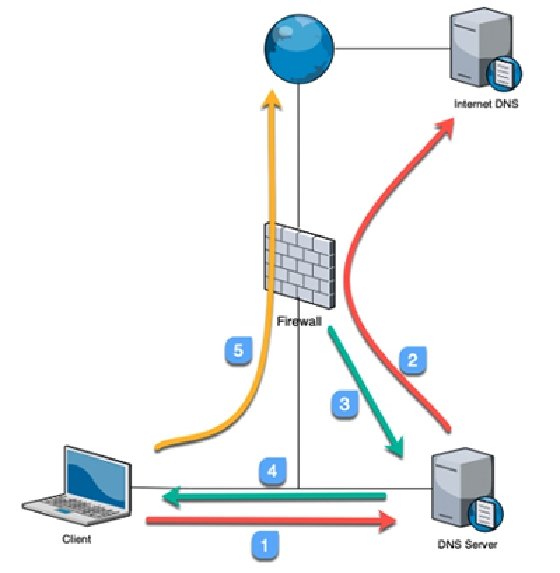
The way that the DNS sinkhole works is illustrated by the following steps and diagram:
- The client sends a DNS query to resolve a malicious domain to the internal DNS server.
- The internal DNS relays the DNS lookup to an internet DNS server.
- The firewall forges a poisoned reply to the DNS query and replies to the internal DNS server with a record pointing to the sinkhole IP.
- The DNS reply is forwarded to the client.
- The client makes an outbound connection to the sinkhole IP, instead of the malicious server. The admin immediately knows which host is potentially infected and is trying to set up Command and Control (C2) connections:
Blocking instead of sinkholing these DNS queries would implicate the internal DNS server as requests are relayed through it. Make sure you set the DNS Security action to sinkhole if you have the subscription license.
The default action for the Command and Control and Malware domains is to block and change them to sinkholes, as shown. For research purposes, you can enable packet capture:
Let's now look at the Vulnerability Protection profile.
The Vulnerability Protection profile
The Vulnerability Protection profile also uses rules to control how certain network-based attacks are handled. ACTION contains the same options as Anti-Spyware: allow, drop, alert, reset-client, reset-server, reset-both, and block-ip. The reset actions send TCP RST packets. block-ip blocks all packets coming from a source and can be set to monitor source to block everything, or a source destination, to only block packets to a specific destination for an amount of time.
Host Type helps determine whether the rule applies to a threat originating from a client (upload), server (download), or either.
Make sure you review Category, as in the following screenshot, as this allows a fine-grained approach to each specific type of threat if granularity and individualized actions are needed at a later stage:
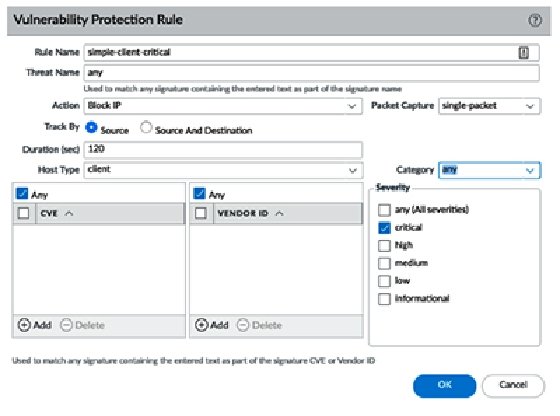
Create the following rules:
- Rule Name: simple-client-critical
- Host Type: client
- Severity: critical
- Action: block-ip (source, 120)
- Packet Capture: single-packet
- Rule Name: simple-client-high
- Host Type: client
- Severity: high
- Action: reset-both
- Packet Capture: single-packet
- Rule Name: simple-client-medium
- Host Type: client
- Severity: medium
- Action: reset-both
- Packet Capture: single-packet
- Rule Name: simple-server-critical
- Host Type: server
- Severity: critical
- Action: block-ip (source, 120)
- Packet Capture: single-packet
- Rule Name: simple-server-high
- Host Type: server
- Severity: high
- Action: reset-both
- Packet Capture: single-packet
- Rule Name: simple-server-medium
- Host Type: server
- Severity: medium
- Action: reset-both
- Packet Capture: single-packet
- Rule Name: simple-low-info
- Host Type: any
- Severity: low, informational
- Action: default
- Packet Capture: disable
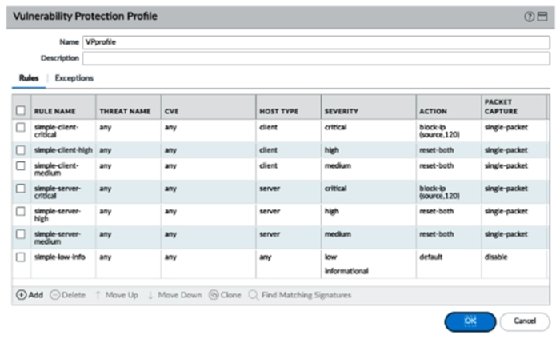
Your profile should now look like this:
About the author
 Tom Piens
Tom Piens has been working with Palo Alto Networks technology for the past 10 years and has authored or contributed to countless knowledge base articles. One of his passions is to help peers figure out how to solve issues or better understand and apply specific features or expected behavior. Piens is also known as "reaper" on the PANgurus and LIVEcommunity forums, as well as "PANWreaper" on Twitter. He enjoys the occasional whiskey or Belgian beer.